Blog Collection
Note: The Blog Collection is not yet available to all Websites 360® users yet. You can create and manage blogs using the Blog page type outlined here.
Blog Collection Overview
- Add and edit blogs
- View and filter blogs by status (Publish, Scheduled, Draft)
- Search for blogs by title
- Duplicate blogs (Duplicating blogs will create a copy of the blog in a Draft status)
- Delete blogs
- Edit a blog’s status
- Configure your Blog Categories and Tags.
- Configure your Blog Collection Settings
- Use AI tools to create blog titles, content, SEO meta data, and blog exerpts.
Configure Your Blogs Collection
To configure your Blogs Collection page, click on the overflow menu in the top right-hand corner and select "Configure Collection."
First, choose the "Details Page Base URL" you want to use for your blog. This will be the slug that your blog posts will appear under. For example, if you choose "post," your individual blog pages will all live under the /post/ slug in your website’s URL. For example:
- https://yourwebsite.com/post/your-blog-post-title
- https://yourwebsite.com/post/another-blog-title
Set Up Categories and Tags
Categories and Tags are powerful tools that help you classify and display your blog posts. They also provide different ways to sort and find your content.
What Are Categories?
Categories are broad groupings that define the main topics or sections of your blog. They provide a hierarchical structure, allowing you to organize your content into distinct areas. For example, if you have a food blog, your categories might be "Appetizers," "Main Courses," "Desserts," and "Drinks."
What Are Tags?
Tags are more specific keywords or phrases that describe the content of an individual blog post. A single blog post can have multiple tags. They act like an index, helping users find content related to very specific topics. Using the food blog example, a post about "Chocolate Lava Cake" might have tags like "chocolate," "dessert," "baking," "easy recipe," and "gluten-free option."
Key Differences and How They Work Together
| Feature | Categories | Tags |
| Purpose | Broad content grouping, hierarchical | Specific keywords, non-hierarchical |
| Quantity | Fewer, general topics | Many, detailed topics |
| Assignment | Typically one per post | Multiple per post |
| Example | "Main Courses," "Travel Tips" | "Pasta," "Hiking," "Budget Travel" |
Creating and Using Categories and Tags
To create your blog categories, visit your Blog Collection, click the menu in the top right corner, and select "Categories."
Then, enter your Categories and the Tags you want to associate with each category. You can add multiple tags at once by separating them with a comma.
Note: You can edit a Category’s name and tags at any time by clicking on the pencil icon.
Important Note on Case Sensitivity: Tags are case-sensitive. This means that "Chocolate" and "chocolate" will be treated as two different tags. To ensure your tags function correctly and your content is easily discoverable, always spell your tags exactly the same on your blog posts and within the category section of your collection. Consistent capitalization is key!
Add Your Blog to Your Website
After your Categories and Tags are created, you can leverage the Collection Block to add filtered lists of your blog posts to any page on your website. You can configure the collection block to only display posts from specific Categories and Tags, providing a highly customizable and organized display of your content.
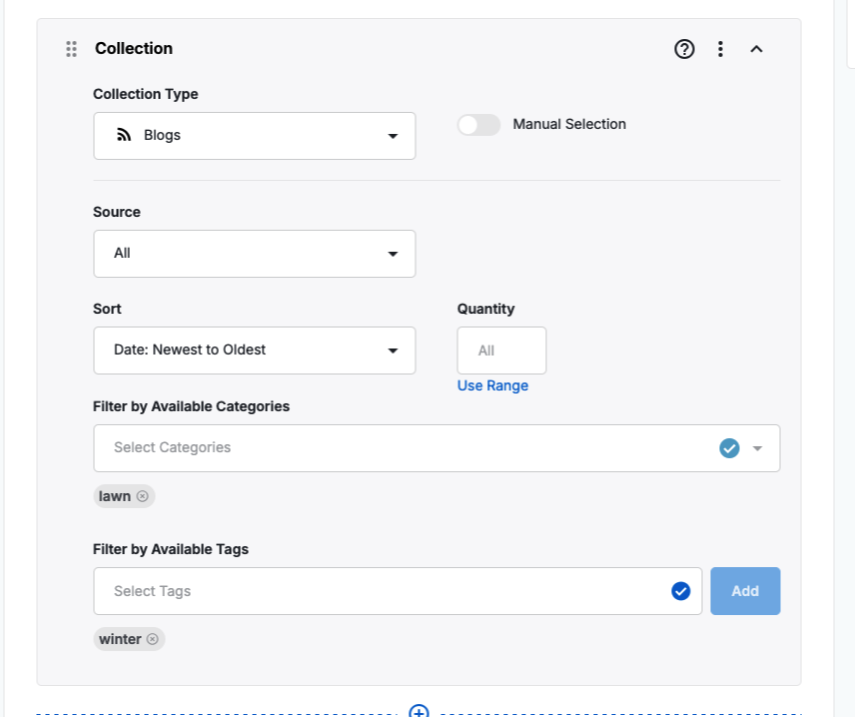
For example, this Collections Blog would only show blogs in the "Lawn" Category with the "Winter" tag:
By effectively utilizing categories and tags, you can significantly improve the navigability and searchability of your blog, making it easier for your audience to find the information they need.
Create a Blog Post
To create a blog post, click on the "Add New Blog" button from your Blogs Collection. This will take you to the blog editor.
To get started, enter your blog Title or use the AI title generator for help by clicking the AI "sparkle" icon.
Next, enter your blog content in the Content box. You can also use the AI Text Generator to create blog content specific to your blog's topic. You must enter a blog title before you can use the content text generator.
You may use the formatting options on your content editing bar to format your text by adding an H1, applying text formatting, creating bullet points or numbered lists, adding quotes, configuring text alignment, and adding buttons, links, photos, videos, and music.
Add a Button to your blog post: To turn text into a clickable call to action button, highlight the text and select the Button icon in your content bar.
Next, select the internal page you want the button to link to, or enter in a URL.
Tip: If you want your button to open up a page in a new tab, make sure that the icon is selected:- Adding quoted text: To turn a specific section of text into a visual quote, select the quoted text and click the "Quote" icon.
- Adding a Featured Image: To add a featured image to your blog post, click on the Featured Image block to select an image from your computer, or drag a file to the area to upload it.
- Adding a Blog Author: You can select an author from your Team Member collection. To add a new author, you will need to add a new teammate to your teammates collection.
- Adding Tags: To add a tag, click on the Tags field and enter as many tags as you’d like. You can auto select existing tags by clicking on them from the dropdown that appears, or click Show all tags to see a list of all tags you’ve used on your existing blog posts.
To remove a tag, click on the X next to the tag.
To add a new tag, enter the tag into the text block and click Add. Generate an Excerpt: Excerpts will appear on your main Blog page as a preview to the blog content.
To automatically generate an excerpt, make sure the Excerpt toggle is on, and the excerpt will be created as soon as you save your blog.
To add an excerpt manually, you can turn off the toggle and add an excerpt in the text box that appears.Generate SEO Meta Data: To automatically generate your SEO title and meta description, toggle the SEO section to On.
SEO meta data will be created as soon as you save your blog.
To create your own SEO data, simply turn off the toggle and add your data in the text box that appears.
Publish Your Blog
Once you have entered your blog content, you can choose when you want it to publish to your website.
- To publish your blog immediately, select the Publish option under Post Visibility. You’ll then click Save & Publish at the bottom of your blog to complete the publishing process.
- To save your blog as a draft, select Draft, then save your blog using the button at the bottom.
To schedule your blog for a certain date in the future, select the option Scheduled. Select the date and time you wish for your blog to post. Then, save the blog to complete the scheduling process.
You may edit the status of your blog at any time on your main Blogs Collections page. Click the overflow menu next to the desired blog post, then select Edit Status from the menu.
When you have finished completing your blog details, scroll down and click Save.
Bulk Actions
Filtering and searching for blogs:
On your main blogs collections page, you will be able to see all of your posts in one place.
View blogs by blog status.
Click on the "Published," "Scheduled," and "Draft" filters at the top of your blogs table to filter by blog status.
Search for blogs: Use the search bar to search for a blog by blog title.
Navigate through your blogs using the pagination at the bottom of your blogs collection, and change how many blogs appear per page.
- To take action on a blog post, click on the overflow menu on the right side of the blog. From this menu you can:
- View Item - This will take you to the blog on your live website. (only available on Published blogs)
- Copy Link - This will allow you to copy the blog’s URL. (only available on Published blogs)
- Duplicate Item - This will create a duplicate of your Blog.
- Edit Status: This will allow you to change the stats of your Blog (Published, Draft or Scheduled).
- Delete - This will delete your blog from your Collection and from your Website.
Bulk Actions: You can delete, tag and untag multiple blogs at a time by using the checkboxes on the left side of your collection, and using the bulk actions. Hint: to select all blogs on a page, click the checkbox at the top left.
Related Articles
Understanding Blog Categories and Tags
Categories and Tags are powerful tools that help you classify and display your blog posts. Think of them as different ways to internally sort and find your content. What are Categories? Categories are broad groupings that help define the main topics ...How to Use Content Marketing Pro
NOTE: Content Marketing Pro is only available for those who have a Content Marketing Pro subscription. If you do not see this option in your Blogs Collection, reach out to your account manager or (833) 203-9165 to learn more. To use Content Marketing ...Call to Action Collection Overview
Note: The Calls to Action Collection is not yet available to all Websites 360® users yet. For more information, contact support@marketing360.com Your Calls to Action Collection is where you can create specific calls to action (CTAs) that can appear ...Create Email Campaigns from Blog Posts
You can repurpose your Blog Content into captivating email campaigns in just a few clicks! Use this guide to learn how to instantly transform your insights into professional emails that keep your business top of mind. Note: This feature is available ...Add New Pages to Your Website
You can add new pages on your website on the Pages dashboard. How to create a new page To add a new page: Select the Pages tab at the top of the Websites app. Click the + Add A Page button at the top of the page. Check the box next to the type of ...